
Clipping is not a Twitch feature. It is a growth system.
The streamers growing fastest right now are not the most talented. They are the ones distributing content every day. One two-hour stream becomes ten clips. Ten clips go to TikTok, Shorts, and Reels. New viewers find the clips. They follow the channel. The cycle repeats.
This guide covers everything: how to clip on PC, mobile, and hotkey, how to edit for TikTok, what makes clips go viral, and when doing it yourself starts slowing you down.
Quick Answer: How to Clip on Twitch
To clip on Twitch on PC: Open a stream or VOD → hover over the video → click the film strip icon → trim to 5–60 seconds → add a title → click Publish.
Hotkey: Press Alt + X (Windows) or Option + X (Mac) during a live stream to instantly capture the last 30 seconds.
On mobile: Tap the screen → tap the Share icon → select Create Clip → trim and publish.
What Is a Twitch Clip And Why It Matters
A Twitch clip is a short video between 5 and 60 seconds, taken from a live stream or past broadcast. Any viewer can create one. The streamer can create them too.
But the clip is not the point. What you do with it is.
Short-form platforms reward three things: a fast hook in the first two seconds, a genuine emotional reaction, and a moment that makes sense without the full stream. Twitch clips, when selected correctly, hit all three.
The top-growing streamers in 2025 Kai Cenat, xQc, NymN all had dedicated clipping operations running alongside their streams. Their clips did not stay on Twitch. They moved to TikTok, YouTube Shorts, and Reddit daily, pulling new audiences back to the channel every time.
The math is simple. One two-hour stream contains 15 to 30 clipable moments. Most streamers use one or two. A clipping agency turns all of them into a week of distributed content. That difference in output is the difference in growth.
Streamers who post five or more clips per week across platforms grow three to five times faster than those posting once per week. The content is the same. The distribution is not. Learn what a clipping agency does
How to Clip on Twitch on PC
Step 1. Open any live stream or past broadcast on Twitch.
Step 2. Hover over the video. A control bar appears at the bottom of the player.
Step 3. Click the film strip icon. It sits on the right side of the control bar, next to the theater mode button. If you do not see it, the broadcaster may have clips disabled for their channel.
Step 4. A clip editor opens. You get a 60-second window to work with. Drag the left and right handles to isolate the exact moment you want.
Step 5. Write a clear title. Titles affect how clips appear in Twitch search. Use the moment itself as the title “xQc reacts to chat” outperforms “LOL” every time.
Step 6. Click Publish. The clip is live within seconds and appears in the channel’s Clips tab.
If the clip icon is missing: Go to Creator Dashboard → Settings → Channel → and confirm that Clips are enabled. This is the most common reason the icon disappears.
Clip length tip: Twitch allows 5 to 60 seconds. For TikTok and Shorts, clips between 18 and 35 seconds consistently outperform longer ones. Trim aggressively. Every second of dead space loses retention.
How to Save Clips on Twitch With a Hotkey
The hotkey is the fastest way to clip during a live stream without breaking focus. Once you understand how to clip on Twitch with a hotkey, missing a key moment mid-game becomes almost impossible.
Windows: Alt + X Mac: Option + X
Press either during a live broadcast and Twitch automatically creates a 30-second clip ending at the exact moment you pressed. You cannot adjust the length this way; it always captures the 30 seconds before the key press. That means you clip after the moment happens, not before.
How experienced streamers use it: React to something → immediately press the hotkey. The clip captures the reaction. Find the clip in Creator Dashboard → Content → Clips within a few seconds of pressing.
Pro setup: Assign the hotkey to a Stream Deck button. Many full-time streamers do this so they never miss a moment mid-game or mid-conversation. One tap clips and they keep going.
How to Make Clips on Twitch Mobile
Twitch mobile clipping works on both iOS and Android. The process is slightly different from desktop but just as fast.
During a live stream:
Tap the screen once. Controls appear. Tap the Share icon in the bottom right; it looks like an arrow pointing upward. Select Create Clip from the menu. Use the slider to trim your window. Add a title and tap Create.
From a past broadcast:
Open the VOD. Tap the three-dot menu in the top right corner. Select Clip. Follow the same trimming steps.
What to know about mobile limitations: The scrubbing tool is less precise with a finger than a mouse. For reaction moments where timing matters by the half-second, clip on mobile and then refine on desktop before downloading. View all your clips under your profile → Clips tab.
How to Edit Twitch Clips for TikTok
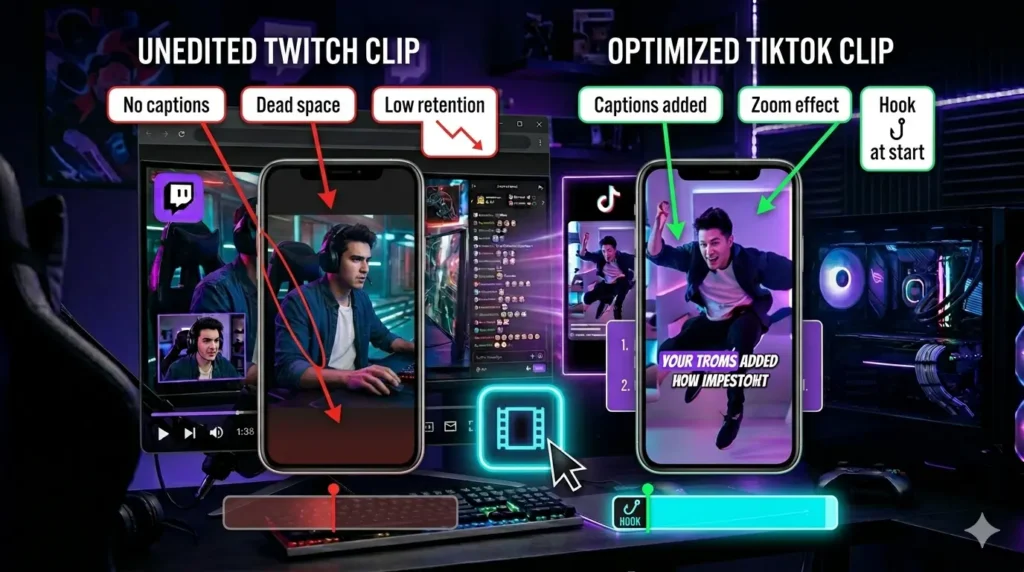
A raw Twitch clip uploaded to TikTok almost never performs. The aspect ratio is wrong. There are no captions. There is usually dead space at the start. Editing is not optional, it is the difference between 200 views and 200,000.
Tools by skill level:
| Tool | Best For | Cost |
| CapCut | Beginners, mobile-first editing | Free |
| DaVinci Resolve | Intermediate editors, full control | Free |
| Adobe Premiere Pro | Professional editors | Paid |
| Descript | Caption-first workflows | Freemium |
Editing checklist for every clip:
- Reformat to 9:16 vertical use blur or mirror effect to fill the frame
- Cut the first two seconds most clips have a slow lead-in
- Add captions 85% of TikTok is watched on mute
- Bold or color the most important word in each caption line
- Zoom in on the reaction at the peak emotional moment
- Remove any pause longer than one second
- End on a loop-friendly frame so the clip replays naturally
Why this matters in numbers: TikTok ranks clips by completion rate. A tightly edited 22-second clip with 80% completion reaches more people than a raw 45-second clip with 40% completion. Edit for completion, not length.
How to Clip Streamers for TikTok
You do not need to be a streamer to build an audience through clipping.
Clipping other streamers is one of the most accessible ways to enter content creation. Find a streamer who produces great content but clips inconsistently. Watch their VODs. Identify the best moments. Edit them for TikTok. Post on a dedicated account built around that streamer or that game.
How clippers earn:
Revenue share is the most common model. The streamer pays a percentage of growth-driven income for consistent clip output. Flat monthly fees work for established relationships. Platforms like Whop have created marketplaces where streamers hire clippers directly. Affiliate deals follow for clippers who build their own audience around a niche.
Always get written permission before monetizing. Most streamers want someone clipping for them. It is a free distribution. A direct message asking to clip professionally is usually enough. Never run ads against a streamer’s content without a signed agreement.
The gap between a streamer’s content quality and their distribution effort is where opportunity exists. That same gap is what a professional clipping service fills at scale. See how clipping campaigns work
How to Start Clipping on TikTok
Starting on TikTok as a clipper whether it is your own content or someone else’s follows the same basic process. The platform rewards consistency over perfection early on.
The starting workflow:
Pick one streamer or one niche. Trying to clip across five different games or creators at the start spreads attention too thin. Pick the one with the most clipable moments and start there.
Post two to three clips per day for the first two weeks. Do not optimize yet. You are collecting data. Watch which clips get replayed, which get shared, and which get skipped in the first two seconds. That data tells you more than any guide.
What to track from day one:
- Average watch time are people finishing the clip?
- Profile visits per clip are viewers curious enough to check the account?
- Follower conversion rate what percentage of viewers follow after watching?
TikTok’s algorithm does not care how long you have been posting. A new account with a clip that hits 80% completion rate gets pushed the same way an established account does. Completion rate is the metric that matters most in the first 30 days. Everything else follows from it.
Common mistake: Most people start clipping on TikTok by posting raw clips with no editing. That works occasionally. It does not work consistently. The edit is what creates the completion rate. The completion rate is what creates the reach.
How to Make Twitch Clips Go Viral
Most clips never leave Twitch. A small number circulates everywhere. The difference is not luck.
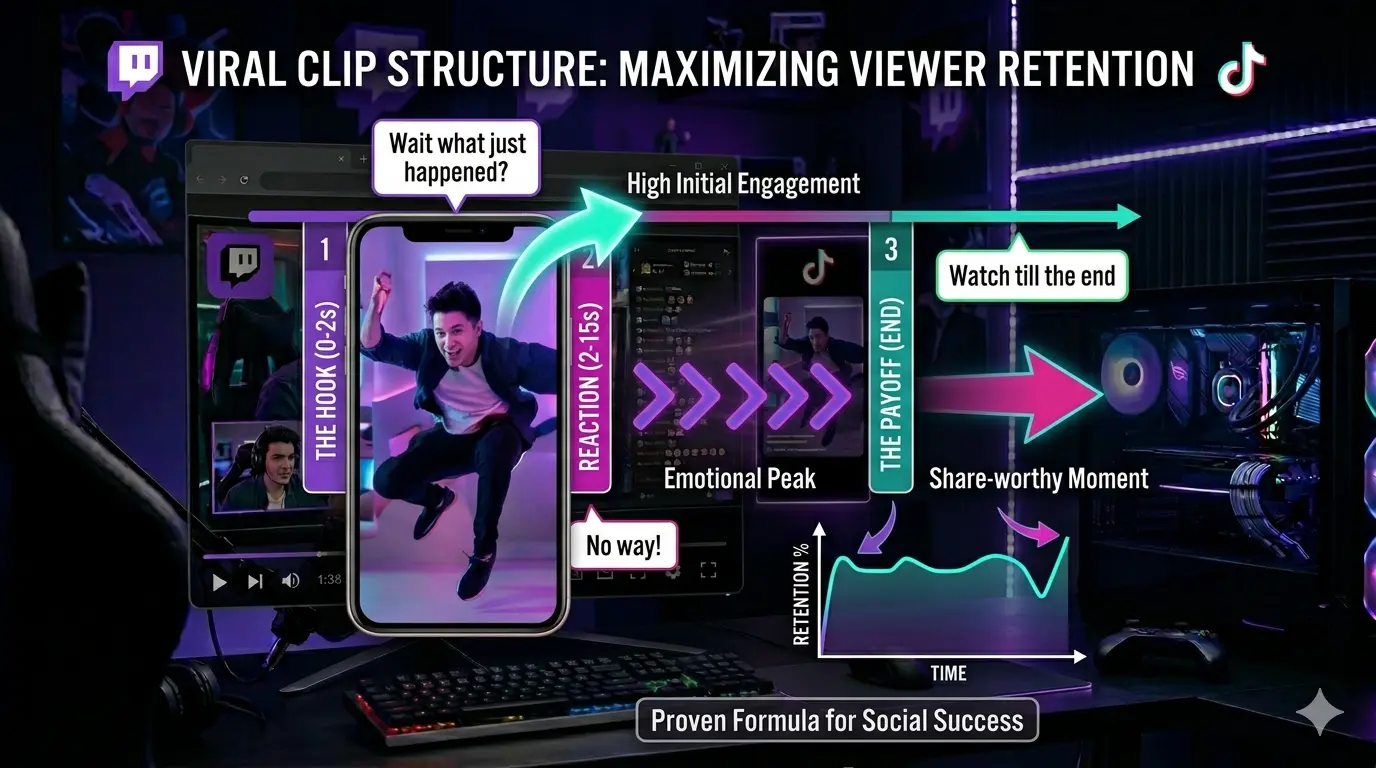
The structure every viral clip follows:
Hook (0–2 seconds): The viewer decides whether to keep watching in the first two seconds. The strongest hooks are mid-sentence reactions, an unexpected visual, or a setup that creates instant curiosity. Starting on dead air or a loading screen kills retention before it starts.
Reaction (2–15 seconds): Genuine emotion drives shares more than skill. The most clipped Twitch moments of 2025 were overwhelmingly reaction-based, not gameplay highlights. Kai Cenat’s subscriber milestones, xQc’s Rust confrontations, and IRL mishap compilations all outperformed mechanical skill clips on every platform.
Payoff (final 5 seconds): The clip needs a clean ending. A punchline. A resolution. A loop. Clips that end abruptly on a non-moment lose completion rate. Clips with satisfying endings get replayed.
Platform differences that matter:
- TikTok rewards humor and reactions over skill
- YouTube Shorts performs better for gaming highlights and technical moments
- Instagram Reels favors personality-driven content over pure gameplay
Check your Twitch clip analytics in the Creator Dashboard regularly. Watch time and completion rate tell you which clip types your audience responds to. The pattern appears within 10 to 15 clips.
How to Repurpose Long-Form Content Into Clips
One stream is not one piece of content. It is a library.
A two-hour stream contains between 15 and 40 clipable moments. Most streamers use one or two. The rest disappear into the VOD archive and are never seen again.
A working repurposing system:
| Input | Output | Platform |
| 1 stream (2 hours) | 8–12 raw clips | Twitch Clips Manager |
| 8–12 raw clips | 4–6 edited clips | TikTok, Shorts, Reels |
| Best 3 clips | Cross-posted with tweaks | All platforms |
| Top performer | Pinned or promoted | Profile + Discord embed |
Where to distribute:
Post to TikTok first it has the fastest feedback loop on what works. YouTube Shorts reaches a different audience and rewards the same clip days or weeks later. Instagram Reels works best for personality clips. Discord embeds drive community engagement inside your server. Twitter/X works for culturally relevant moments that tie into broader conversations.
The scaling problem: Doing this manually takes three to five hours per week at minimum. For streamers going live four or more times weekly, it becomes a second full-time job. This is where a clipping service changes the growth curve not by improving the stream, but by making sure the stream’s best moments reach people every single day. See the full cross-platform distribution guide
Twitch Clip Manager and Analytics
Every clip you create lives in one place: Creator Dashboard → Content → Clips.
This is your Twitch Clip Manager. It shows all published clips sorted by date, with view counts next to each one. It is also where you download clips for editing click any clip, then click the share icon and select Download to save the MP4.
What to track inside the Clip Manager:
View count tells you what performed. But view count alone is misleading a clip from a popular streamer’s raid will always outperform a clip from a quiet stream regardless of quality. The more useful signal is the ratio of views to stream concurrent viewers. A clip that gets 5,000 views from a stream with 200 concurrent viewers performed exceptionally. A clip with 5,000 views from a stream with 10,000 concurrent viewers did not.
Twitch clip analytics beyond the Manager: Twitch’s native analytics are limited. For deeper data which clips drove follows, which generated channel page visits, which performed best by day of week connect your Twitch account to a third-party dashboard like Streams Charts or Sullygnome. Both are free and give you the performance context the native Clip Manager does not.
AI Twitch Clip Generators vs a Real Clipping Agency
AI clipping tools have improved. Opus Clip, Vizard, and similar AI twitch clip generators can scan a two-hour VOD and surface potential highlights in minutes. They are worth understanding clearly.
What AI tools do well: They find candidate moments based on audio peaks and chat activity. They generate basic captions. They save time on the initial selection pass. For a streamer posting casually with no growth goals, they are sufficient.
What AI tools consistently miss:
| What AI Misses | Why It Hurts Growth |
| Context and narrative | A moment funny in context reads as random out of context |
| Reaction timing | The best frame is often 1–2 seconds after where AI cuts |
| Platform differences | TikTok and Shorts need different edits AI treats them the same |
| Brand voice | Every clip should feel like the same creator |
| Content strategy | AI creates volume. It does not build an audience. |
Is it worth hiring a clipping agency?
If you stream once a week and growth is not a priority, use an AI tool.
If you want consistent growth daily output, platform-specific editing, clips that compound over time AI tools produce content without direction. The clips exist. They just do not build anything.
The streamers at the top of the Twitch clips leaderboard by monthly views are not running AI tools alone. They have editors who understand their audience, know what performs on each platform, and treat every stream as a content production session not just a live event. See how AI compares to a real clipping agency
When to Stop Clipping Yourself
There is a point where clipping your own content costs you growth instead of creating it.
The signs are clear: You stream four or more times per week but post fewer than five clips across all platforms. Editing takes longer than two hours per session. Your clip quality is inconsistent some good, most average. You miss the best moments because you cannot watch your own stream objectively. Growth has plateaued despite consistent streaming.
What the shift looks like: Streamers who move from self-clipping to a structured clipping system typically see three changes within 30 days. Daily content output across platforms. Measurable increases in profile visits from short-form traffic. More time focused on the stream itself because post-production is handled.
What to look for in a clipping service:
- Daily output not occasional bursts
- Platform-specific editing not the same clip posted everywhere
- Editors who watch your content and understand your style
- Transparent reporting on views, reach, and follower attribution
- A clear revision process and direct communication
The best video clipping service is not the cheapest and not the one with the most AI features. It is the one that treats clipping as a growth strategy, not a task on a checklist.
Final Thoughts
Clipping is distribution. Distribution is growth.
Most streamers fail to grow not because their content is bad but because almost no one sees it. They stream to live viewers. They archive the VOD. They start again tomorrow. The content exists it just never leaves the platform.
The streamers who compound their growth treat every stream as a production session. The live stream is the source material. The clips are the product. The platforms are the distribution network.
When that system runs daily consistent output, platform-specific edits, strong hooks, clean completion rates growth stops being something that happens occasionally and starts being something that happens predictably.
Learning how to clip on Twitch is the first step. Building the system around it is what actually moves the channel.
Frequently Asked Questions
How long can a Twitch clip be?
Twitch clips can be between 5 and 60 seconds. For TikTok and Shorts, 18–35 seconds performs best. Trim to the strongest moment.
Can you clip on Twitch without an account?
No. You need a Twitch account to create clips. Viewing clips does not require an account.
Where do Twitch clips save?
Clips save to the channel’s Clips tab automatically. Access your own clips through Creator Dashboard → Content → Clips.
How do you download a Twitch clip?
Open the clip → click the share icon → select Download. The clip saves as an MP4 file ready for editing.
Can you make a Twitch clip longer than 60 seconds?
Not natively. For longer highlights, use the VOD editor to create a highlight instead of a clip. Highlights have no length limit.
What is the hotkey to clip on Twitch?
Alt + X on Windows. Option + X on Mac. This captures the 30 seconds before you pressed the key.
Is clipping other people’s Twitch streams legal?
Twitch clips are covered by the platform’s terms of service. Viewing and sharing clips is permitted. Monetizing another streamer’s clips requires their explicit permission.
Every Day You Wait, A Competitor Gets the View
We recruit, train, and manage a clipping army that distributes your content across 50–500 accounts on TikTok, Reels, and Shorts simultaneously. One upload becomes hundreds of posts. Every single day.
Trusted by 1,000+ creators · 10 Billion+ views generated


